Wednesday, November 20, 2013

Another "Redo"

I noticed while reorganizing after the chaos that is the "tear-down" following a show, that one of the polymer bicone beads on this faux lapis lazuli choker was cracked. The tension was too tight on the stringing wire and the sterling spacer bead had worked it's way into the beads end.


Not sure what I was going to do, it was obvious that repairs at the least, were inevitable. Luckily, this neckpiece was constructed in two separately strung parts, so I wasn't going to have to deal with back portion and all the smaller seed beads.

First, I looked through polymer components, but nothing suitable was available. Next, I considered sterling and/or coiled wire beads. It wasn't just a matter of closing up the gap left by the bicones - this piece needed both the interest and the length provided by these elements.

Finally, I sorted through my miscellaneous beads. I found two black onyx parts from a pair of interchangeable "door knocker" earrings (remember those?) But, given their size, they didn't look right in the same space as the bicones - too big. I moved the smaller ingots outward, provided a slide for the onyx with a couple of sterling crimp tubes and hung them with large jumprings. They don't lie completely flat, but hang at a bit of an angle.


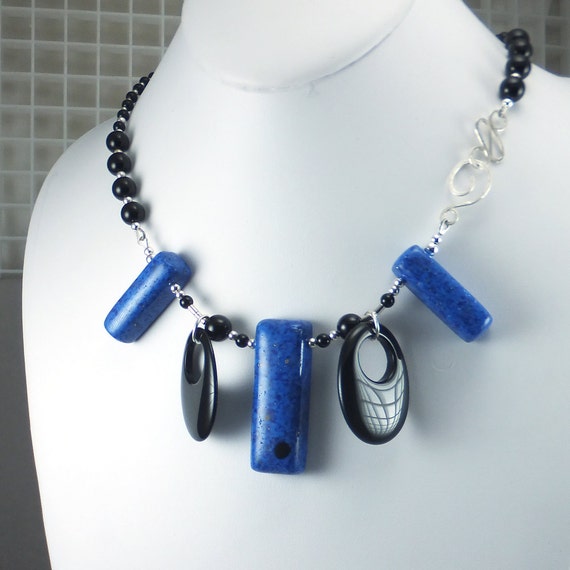
I like it! This choker looks updated and a bit more interesting, don't you think?

Thursday, September 26, 2013

Fair Feathered Friends

I have two parrots, Neelix and Kes (yes, my StarTrek geekiness is showing). The first is a normal cockatiel male, the second is a blue-headed Pionus parrot female. They have lived with us for over 15 years. Parrots typically molt (shed old feathers to make room for new) several times a year. I'm blessed with beautiful gray and white (Neelix) and mostly green (Kes).

She also has magnificent tail feathers that are tri-color, blue, red and green. I especially watch for these on the cage bottom, not only because they are so unusual, but because I've wanted to do something polymer-related with them for some time.

This is Kes, visiting the studio. 
You can just see the red portion of her tail feathers.

Last week, she also gifted me with some tiny, delicate mostly red feathers that I knew would be wonderful layered with the tri-color. So, making sure that I had both "right" and "left" pieces (they are actually a bolder color on the "front"), I constructed a layered polymer base of navy blue, red center and green, textured back. With custom sterling earwires and findings, these earrings practically made themselves!

Feathered Earrings No. 156


In the next couple of months, watch as I also pay homage to Neelix's plumage with some classic gray and white (and maybe a bold surprise thrown in ;-) 


Sunday, March 31, 2013

Which Neckpiece for Which Neckline?

11BOLDstreet has over 4 dozen unique, one-of-a-kind neckpieces from which to choose. Need help deciding? Here is a graphic that has been floating around the internet with some great suggestions for this pleasant dilemma...

(I believe that credit goes to Polyvore.)

Saturday, February 23, 2013

Doodles, a Follow-up

Wondering what I did with the Zentangle doodles from a couple of weeks ago? I created a transfer and applied it to a sheet of off-white polymer. Then I layered that sheet onto one of my favorite right-from-the-package colors of Premo polymer - Rhino Grey - to which I added a bit of texture and antiquing.
This assembly got backed with multiple textures in black, the end portions receiving additional coloring in the form of chalk stamp ink. The base of this valet/bowl is a chunky polymer block in a stamped abstract pattern of rhino, off-white and black. Fun, home decor graphics!!!

Wednesday, February 20, 2013

Introducing Fantasy Flora (or Alien Flowers)

I've had this idea for gauze/polymer "alien" flora knocking around in my head for a while. (Those who know me at all won't be surprised...)

Most of the pre-planned methodology actually worked out well. The "petals" would be of liquid polymer and gauze, pistil and receptacle equivalents would be of polymer and the stamens and stems would be of wire. And the stems would be totally frivolous and have loops.

First I created the pistil from a yellow-orange blend of polymer, textured the end and added several coats of tinted liquid polymer. Next, I gathered one edge of black, white and (stained) purple gauze, treated them to a soaking in liquid polymer and wound them around the pistil.

Then I covered the base with more polymer, stamped and mica-d the receptacle (in patterns not seen on this world!) and mounted them on nicely looped, thick copper wire stems. I grabbed my torch and beaded the ends of some sterling wire, crimped some copper headpins and spiraled some silver plated wire and behold - I had some wonderful little alien stamens to embed in the pistils!

 On to the vase/container... I hoard plastic shapes which I feel could stand up to a 280ยบ cure, so finding a container base wasn't too difficult. A window cleaner spray cap seemed the perfect scale, and it had a wonderful center well for anchoring the stems. Now for the covering...


Like almost anyone breathing in the polymer world, I've been itching to give the Stroppel cane a try! The few cane scraps that I have are luckily a perfect color complement to the floral petals. So, strips of my new cane, plus silver, copper and black practically covered the cap by themselves. The sanding and buffing took over an hour, but what else is new?

Here is the finished creation. I've learned enough during design/construction for at least two more "species". It's kind of neat how the stems and stamens silently jiggle at the slightest vibration... sort of ALIEN!

Fantasy Flora No. 101, 8 1/2" H., base 2 3/4"dia. x 2"H

Monday, February 4, 2013

Doodling is Now Acceptable, Mrs. Ringle!


Over the last month or so, I've been having fun with Zentangles. Yes, I'm a few years late to the game, and as many of you already know, Zentangling is a controlled method of doodling, something that I've done, well, FOREVER! 
Case in point: 1st Grade, 1961-ish. We had the metal desks with the laminated wood-look tops that were hinged at the back. One day, at the end of a lesson, I beat everyone else in opening my desk to get to the next task. So, even though I was way at the back of the room, my desk top was in full view of the teacher. All I heard was "WHAT HAVE YOU DONE TO YOUR DESK???" I shut my desk in puzzlement and saw the teacher (who I'd really liked a lot, up until that point) bearing down upon me.

The next few minutes are more hazy in this memory. All I remember was crying ashamedly (though not sure why) while the teacher and every other first grader crowded around to look with wonder at my desk top which was almost entirely covered with black No. 2 pencil doodles! I don't consciously remember creating them. They must have "just happened" over a series of days (weeks?) building up to this climax. The only other memory that I have of that particular experience is spending the next recess with those horrid brown paper towels and a can of Comet cleanser (borrowed from the janitors closet) scrubbing off my works of art.

Well, nah-nah-nah Mrs. Ringle - now my doodles are condoned, and even encouraged! So here are my first two attempts beyond the basic Zentangle "tile". I sort of like them, and am already planning an incorporation into a current polymer piece. Stay tuned.....


Saturday, January 5, 2013

Time of Renewal

I've got several ideas for new polymer directions to explore over the coming months. In the meantime, as I narrow my focus on which technique to tackle next, I decided to turn a critical eye towards some existing designs. Several pieces in my current stash could benefit from a bit of tweaking. Updating. Renewal.

While I've vowed never to put something out there which I don't absolutely love, I've got to admit that my tastes have changed a bit over the last couple of years, as (hopefully) my artistic eye has developed.

This choker is the first such piece to be revamped in 2013. While I loved the original, I now found the cord treatment a bit too busy, and the focal to be sort of bland, despite quite a bit going on.
Having discovered some thicker 3mm leather available locally, I decided to try a cleaner, simpler cord material which didn't compete with the polymer focal. And, as for the focal some surface cracking and carving were introduced, and the entire piece was treated to black antiquing. Finally, the lower textured element was covered with a thin layer of lighter silver polymer, then highlighted with metallic mica.

 I believe that texture (beyond "smooth" which is also texture) was what was currently lacking, and that the overall design now has a more pleasing balance.


Let's see what else I can get in to... :D